
Table of Contents
- How to Install Steel Pipe Bollards: Overview
- Tools and Materials Required for Bollard Installation
- Types of Bollard Installation Methods
- Site Preparation and Marking Installation Points
- Excavation and Footing Depth Requirements
- Step-by-Step Installation Process
- Concrete Pouring and Curing Best Practices
- Bollard Installation Cost Estimation
- Safety Precautions and Regulatory Compliance
- Common Installation Mistakes and Troubleshooting
How to Install Steel Pipe Bollards: Step-by-Step Guide
Last Updated: July 26, 2026
How to Install Steel Pipe Bollards: Overview
Understanding how to install steel pipe bollards is essential for protecting property, controlling traffic flow, and creating secure perimeters around commercial and industrial sites. Steel & Pipe Supply specializes in providing high-quality steel pipe bollards and the guidance contractors need to install them correctly. A properly installed bollard system combines structural integrity with durability, which depends entirely on execution during installation.
Steel pipe bollards serve critical safety functions across parking lots, storefronts, warehouses, and pedestrian zones. The difference between a bollard that performs reliably for decades and one that fails prematurely comes down to installation technique, material selection, and adherence to local building codes. Whether you’re working with fixed bollards that embed deep into concrete or surface-mounted options with base plates, the fundamentals remain consistent: proper site preparation, correct embedment depth, quality concrete, and attention to plumb alignment.
The most critical factor in bollard installation is embedment depth combined with proper concrete curing. A bollard set too shallow will shift under impact; one in weak concrete will fail prematurely. Get these two elements right, and your bollard system will outlast most other site infrastructure.
Tools and Materials Required for Bollard Installation
Essential Equipment
Installing steel pipe bollards demands precision tools and safety equipment. You’ll need a power drill with a 1-inch auger bit, or for larger installations, a handheld auger or rotary drill. A jackhammer with a pointed chisel breaks through existing asphalt or concrete.
Measuring tools are essential: a 25-foot tape measure, a 4-foot or 6-foot level for checking plumb, and a carpenter’s square for layout. An angle grinder cuts rebar to length. For concrete work, you’ll need a concrete mixer (or ready-mix delivery), mixing buckets, a concrete shovel, and a trowel. A wheelbarrow moves excavated soil efficiently.
Safety equipment includes heavy-duty work gloves, steel-toed boots, a hard hat, eye protection, and dust masks when cutting or grinding.
Materials Checklist
Each bollard installation requires the steel pipe bollard itself (typically 4-6 inches in diameter), anchor bolts, and a rebar cage if embedment exceeds 24 inches. Use 4000-PSI concrete for superior strength. Budget approximately 2-3 cubic feet of concrete per bollard for typical embedment depths of 24-36 inches.
A drainage base of 4-6 inches of gravel prevents water accumulation and frost heave. PVC sleeves protect rebar. Grout seals the space between the bollard and concrete. For surface-mounted options, you’ll need a base plate (typically 12×12 inches) and lag bolts matched to your concrete.
| Item | Purpose | Typical Quantity |
|---|---|---|
| Steel pipe bollard | Primary barrier | 1 per installation point |
| 4000-PSI concrete | Structural support | 2-3 cubic feet |
| Rebar (½-inch) | Reinforcement cage | 4-6 pieces per bollard |
| Anchor bolts | Bollard anchoring | 4-8 per bollard |
| Gravel drainage base | Water management | 4-6 inches deep |
| PVC sleeve | Rebar protection | 1 per rebar cage |
| Grout | Sealing | 1-2 gallons |
Types of Bollard Installation Methods
Fixed vs. Surface-Mounted Installation
Fixed bollards embed directly into the ground, with the pipe extending 24-48 inches below grade, providing maximum impact resistance for high-traffic security applications. Fixed installations require excavation, proper footing depth, and concrete curing time of approximately 7 days before the bollard bears full load.
Surface-mounted bollards sit atop the ground with a base plate anchored to existing concrete. This approach works well in retrofit situations where excavation isn’t practical or where bollards may need relocation. Surface-mounted systems install faster and cost less upfront, but they’re more vulnerable to impact damage.
For maximum structural integrity and long-term reliability, fixed bollards are the industry standard. Steel & Pipe Supply recommends fixed installation for permanent applications where security and durability are priorities.
Base Plated and Embedded Options
Base-plated bollards use a welded or bolted steel plate (typically 12×12 inches or larger) as the foundation, distributing the bollard’s load across a wider concrete surface and reducing the risk of concrete cracking. This method works particularly well for multiple bollards installed in a line.
Embedded bollards (without a base plate) rely entirely on concrete grip and friction, with rebar cages surrounding the pipe for additional strength. This method works best when embedment depth exceeds 30 inches and concrete quality is verified.
Many contractors prefer base-plated options because they simplify plumb alignment and provide a clear visual reference during installation. The plate also protects the top of the concrete from weathering.
If you’re installing bollards in areas prone to freeze-thaw cycles, base plates help prevent heaving that occurs when water freezes beneath the bollard, distributing stress more evenly and reducing cracking.
Site Preparation and Marking Installation Points
Layout and Spacing Requirements
Before excavation, mark your bollard locations with precision. Bollard spacing depends on your security goal: pedestrian protection typically requires 4-5 feet between bollards, while vehicle control needs 3-4 feet. Measure from the center of each bollard to ensure consistent spacing. Use chalk lines or spray paint to mark the excavation perimeter, typically a 12-inch diameter circle for a 4-inch pipe bollard.
Verify clearances for utilities before marking. Call your local utility locating service (811 in most U.S. states) at least 48 hours before digging to prevent costly and dangerous hits on gas lines, water mains, or electrical conduits. Mark utility locations on your site plan and adjust bollard positions if necessary.
Layout bollards in a straight line for visual consistency and easier traffic control. Use a transit or laser level to ensure all bollard centers align horizontally.
Excavation and Footing Depth Requirements
Determining Embedment Depth
Embedment depth is the single most critical factor in bollard performance. Most fixed bollards require 24-36 inches of embedment, though frost line depth in your region may dictate going deeper. In northern climates where frost penetration exceeds 36 inches, embedment should match or exceed local frost line depth (typically 42-48 inches in Minnesota or Michigan, 24-30 inches in moderate climates).
A general rule: embedment depth should be at least 1.5 times the bollard’s above-ground height. A bollard extending 36 inches above grade should embed 54 inches below grade for optimal moment resistance. However, practical constraints often limit depth to 36 inches, which provides adequate performance if concrete quality and rebar reinforcement are correct.
Never attempt to install a fixed bollard with less than 24 inches of embedment; the bollard will rotate under impact and concrete will crack prematurely.
Drainage Base and Gravel Preparation
After excavation reaches the required depth, install a drainage base of 4-6 inches of clean gravel or crushed stone. This layer prevents water from pooling at the bottom of the hole, which causes frost heave in winter and concrete deterioration year-round. Compact the gravel lightly with a hand tamper.
For locations with poor drainage or high water tables, increase the gravel base to 8 inches and consider adding a perforated drain pipe at the bottom of the hole. This pipe channels water away from the bollard’s base, extending concrete life significantly.
Tamp the gravel surface until it’s flat and firm, then verify levelness with a 4-foot level. Any slope in the base will cause the bollard to set at an angle, compromising both aesthetics and structural performance.
Step-by-Step Installation Process
Step 1: Prepare the Excavation
Mark the excavation perimeter with chalk or spray paint, centered on your layout mark. For a 4-inch pipe bollard, mark a circle 12-14 inches in diameter. If excavating through asphalt or concrete, use a jackhammer with a pointed chisel to break the surface, then remove debris.
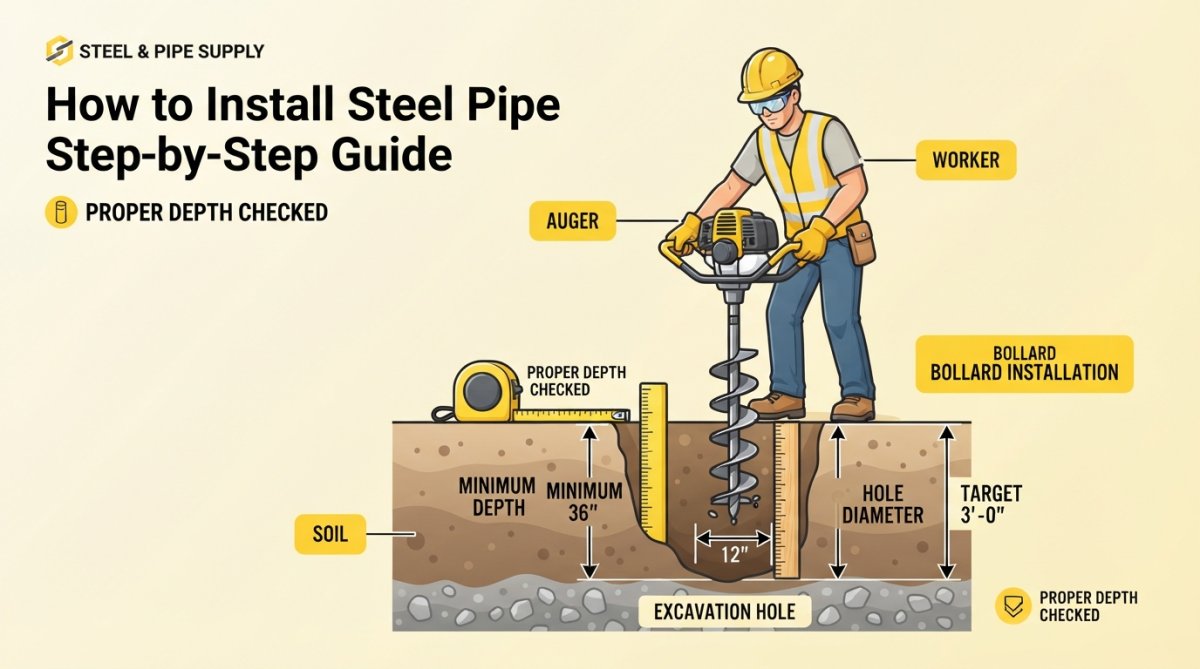
Excavate to your predetermined depth, keeping the sides as vertical as possible. Remove all loose soil and debris from the bottom. If you hit rock or hardpan, either excavate deeper to reach softer soil or adjust your design to a shallower embedment with a larger base plate.
Inspect the hole for water accumulation. If water is present, allow it to drain for 24 hours or use a small sump pump to remove standing water. Wet concrete is weaker than dry concrete.
Step 2: Install Drainage and Gravel Base
Add 4-6 inches of clean gravel to the bottom of the excavation and compact with a hand tamper until firm. Verify the gravel surface is level using a 4-foot level. This step is critical; a sloped base will cause the bollard to set at an angle.
For installations in high-water areas, lay a perforated drain pipe (typically 2 inches in diameter) along the bottom of the gravel base. This pipe should exit the excavation area or connect to a drainage system that carries water away from the bollard.
Step 3: Set and Plumb the Bollard
Place the steel pipe bollard into the excavation, centering it over the gravel base. Verify that the bollard is perfectly plumb using a 4-foot or 6-foot level. Check plumb in two directions: north-south and east-west. Adjust the bollard position until both readings show zero deviation from vertical.
For base-plated bollards, ensure the base plate sits flat on the gravel. Shim the plate with gravel as needed to achieve a level base.
Use temporary braces if the bollard is tall or if wind conditions are present. Wooden 2×4 braces bolted or clamped to the bollard and anchored to ground stakes hold the bollard plumb while concrete cures.
A bollard that sets out of plumb by even 1-2 degrees will look wrong and will perform poorly under impact. The moment forces from a vehicle strike will concentrate on one side of the concrete footing, causing cracking. Always verify plumb before pouring concrete.
Step 4: Install Rebar Cage and Anchor Bolts
For embedment depths exceeding 24 inches, construct a rebar cage from ½-inch rebar. Tie four vertical pieces around the bollard pipe with wire ties, spaced evenly around the circumference. Connect these verticals with horizontal rebar ties every 12 inches up the height of the embedment.
The rebar cage should be positioned 2-3 inches away from the bollard pipe and 2-3 inches from the excavation walls. This spacing allows concrete to flow around the rebar, creating a strong composite structure.
Anchor bolts (typically ¾-inch or 1-inch diameter) thread through the bollard or attach to a base plate. For base-plated bollards, four to eight anchor bolts distributed evenly around the plate provide redundant attachment.
Step 5: Pour and Cure Concrete
Mix 4000-PSI concrete according to manufacturer specifications, or arrange ready-mix delivery if pouring more than 2-3 cubic feet. Pour concrete into the excavation around the bollard, working slowly to allow air bubbles to escape. Use a concrete vibrator if available.
Fill the excavation to ground level, slightly overfilling to account for settling. Strike off excess concrete with a straight edge, then trowel the surface smooth. For aesthetic installations, create a slight crown that sheds water away from the bollard.
Do not disturb the bollard or remove braces until concrete has cured for at least 48 hours. In cool weather (below 50°F), extend curing time to 72 hours. The bollard should not bear any load until concrete cures for a minimum of 7 days.
Concrete Pouring and Curing Best Practices
Using 4000-PSI Concrete
4000-PSI concrete provides the strength necessary for bollard installations to withstand repeated impact and environmental stress. This specification means the concrete will support 4,000 pounds per square inch of compressive force. Order 4000-PSI concrete from a ready-mix supplier rather than mixing on-site if you’re pouring more than a few bollards.
If you must mix concrete on-site, use a concrete mix designed for high-strength applications and follow the manufacturer’s water-to-cement ratio exactly; too much water weakens the final product.
Add air entrainment to concrete if you’re in a freeze-thaw climate. Air entrainment introduces tiny air bubbles that allow water to expand during freezing without cracking the concrete.
Proper Curing Timeline
Concrete strength develops through hydration. The strength curve is steep for the first 7 days, then continues to increase more slowly for up to 28 days. For bollard installations, the critical milestone is 7 days, when concrete typically reaches 70% of its full strength and can bear design loads.
Keep the concrete moist during the curing period. If weather is hot and dry, mist the concrete surface with water twice daily for the first 7 days. If rain is expected, cover the bollard area with plastic sheeting to prevent excessive water saturation.
Temperature affects curing speed. Cold weather (below 50°F) slows hydration significantly; concrete poured in 40°F weather may require 14 days to reach 7-day equivalent strength. In extreme heat, shade the installation area and mist frequently.
Never apply de-icing salts or heavy loads to the concrete during the first 28 days.
Bollard Installation Cost Estimation
Material and Labor Factors
Material costs for a single fixed bollard installation include the bollard itself, concrete, rebar, and hardware. Steel & Pipe Supply offers competitive pricing on high-quality bollards and can provide a detailed quote based on your specific requirements. Contact Steel & Pipe Supply for a free quote on materials for your project.
Labor costs vary by region and complexity. Simple surface-mounted installations on existing concrete might require 2-3 hours of labor. Fixed installations with deep embedment and rebar cages typically require 4-6 hours per bollard. Multiple bollards installed in a line benefit from economies of scale.
Regional differences are significant. Urban areas with high labor costs and expensive concrete delivery may see installed costs 40-50% higher than rural areas. Difficult soil conditions and limited equipment access add cost.
Steel & Pipe Supply can help you estimate materials accurately. Call for a free quote and let our team help you plan your project budget.
Safety Precautions and Regulatory Compliance
ADA Standards and Spacing Compliance
The Americans with Disabilities Act (ADA) establishes specific requirements for bollard placement and spacing. Bollards installed to protect pedestrian areas must be spaced to prevent wheelchair passage, generally no more than 4 feet apart. Bollards protecting vehicle areas can be spaced further apart (typically 3-4 feet).
Bollard height matters for ADA compliance. Bollards should extend at least 36 inches above grade to be visible to drivers and to provide adequate protection. For pedestrian areas, bollards should be detectable by cane users, they’re most detectable when they have a contrasting color or reflective markings.
Document your bollard specifications and spacing in your project records. Having accurate records demonstrates due diligence if your installation is subject to ADA compliance review.
Impact Resistance and Structural Integrity
Steel pipe bollards must resist impact from vehicles and equipment. A standard 4-inch diameter bollard with 30-inch embedment in 4000-PSI concrete can typically withstand a 4,000-5,000 pound vehicle impact at 5 mph without permanent deformation.
Test impact resistance by reviewing your bollard’s specifications for K-rating or crash rating. K-ratings are standardized by the American Society for Testing and Materials (ASTM) and indicate the speed and vehicle weight a bollard can stop.
Inspect installed bollards periodically for signs of damage: cracks in concrete, visible deformation of the pipe, or separation between the bollard and concrete base. Any of these signs indicate the bollard has sustained impact and may need replacement.
Paint bollards with high-visibility colors (yellow and black stripes, or bright orange) to make them visible to drivers and equipment operators. Visibility reduces accidental impact and extends the bollard’s service life.
Common Installation Mistakes and Troubleshooting
Improper Plumb and Alignment Issues
The most frequent installation error is allowing bollards to set out of plumb. Even a 1-2 degree deviation from vertical causes uneven load distribution and accelerates concrete cracking. This happens when temporary braces are removed too early or when the gravel base isn’t level.
If you discover a bollard is out of plumb after concrete has partially set (but before full cure), you may be able to adjust it. Loosen temporary braces and carefully reposition the bollard using a level, then retighten braces and allow concrete to cure fully. If concrete has fully cured, removing and resetting the bollard is the only correction.
Prevent this issue by checking plumb in two directions before pouring concrete and by using multiple temporary braces to hold the bollard stable. Leave braces in place for at least 48 hours.
Concrete Failure and Curing Problems
Concrete that cracks, spalls, or deteriorates prematurely typically failed because of improper curing, weak concrete mix, or inadequate drainage. Cracks that appear within days of pouring usually indicate rapid surface drying; the concrete was not kept moist during curing. These surface cracks allow water infiltration, which accelerates deterioration.
Spalling (concrete chunks breaking off) occurs when water freezes inside the concrete, expanding and breaking the surface. This happens when concrete is exposed to freeze-thaw cycles without air entrainment, or when de-icing salts are applied too early. Prevent spalling by using air-entrained concrete in freeze-thaw climates and by delaying salt application until 28 days after pouring.
Structural concrete failure indicates the concrete mix was too weak or the footing was inadequate. The bollard must be removed and reset with stronger concrete and deeper embedment.
Drainage and Frost Heave Prevention
Frost heave, the upward movement of the ground and bollard during freeze-thaw cycles, occurs when water beneath the bollard freezes and expands. Over multiple cycles, this can raise a bollard several inches.
Prevent frost heave by installing adequate drainage (4-6 inches of gravel base, plus a perforated drain pipe in high-water areas) and by ensuring the bollard embedment reaches below the frost line. In Minnesota or Wisconsin, this means 48+ inches of embedment. In moderate climates, 30-36 inches is usually sufficient.
If frost heave has already occurred, check the bollard for plumb and for concrete cracks. If the bollard is only slightly out of position and concrete is undamaged, monitor it through the next winter. If movement continues or concrete is cracked, the bollard must be removed and reset deeper.
Installing steel pipe bollards correctly requires attention to detail at every stage, from site preparation through concrete curing. A properly installed bollard protects people and property for decades; a poorly installed one fails within years or months. Steel & Pipe Supply provides the high-quality bollards and expert guidance you need to get it right the first time. Contact Steel & Pipe Supply today for a free quote on materials and expert advice on your installation project.
Frequently Asked Questions
What is the proper embedment depth for installing steel pipe bollards?
Embedment depth typically ranges from 24 to 36 inches depending on soil conditions, bollard diameter, and impact resistance requirements. Heavier-duty applications and softer soils require deeper embedment. Always consult local building codes and structural engineering specifications for your specific project. A proper drainage base beneath the footing is essential to prevent frost heave and water accumulation.
What tools are needed to install steel pipe bollards?
Essential tools include a power auger or excavator for digging, a level and plumb bob for alignment, a drill with appropriate bits for anchor bolts, concrete mixing equipment, measuring tape, and safety gear. You'll also need a concrete saw for any coring work and a tamper for compacting the gravel drainage base. Renting heavy equipment from a local supplier is cost-effective for single installations.
What are ADA spacing requirements for bollard installation?
ADA standards typically require bollard spacing of 4 feet or less (center-to-center) to prevent passage of vehicles while maintaining pedestrian accessibility. However, spacing may vary based on the specific application and local jurisdiction requirements. Check with your local authority having jurisdiction and consult current ADA guidelines before finalizing your installation layout to ensure compliance with all accessibility standards.
How long does concrete need to cure before bollards are load-tested?
Standard 4000-PSI concrete requires a minimum 28-day cure period for full strength development. However, most installations allow light use after 7 days. For heavy-duty applications or traffic control barriers, wait the full 28 days before subjecting bollards to impact or significant loading. Environmental factors like temperature and humidity affect curing time, so monitor conditions carefully and adjust timelines accordingly.
This article was written using GrandRanker